Step‑by‑step: insulated Swedish slab construction sequence
The exact specification depends on soil, frost depth, groundwater, and engineering, but the practical sequence stays consistent.
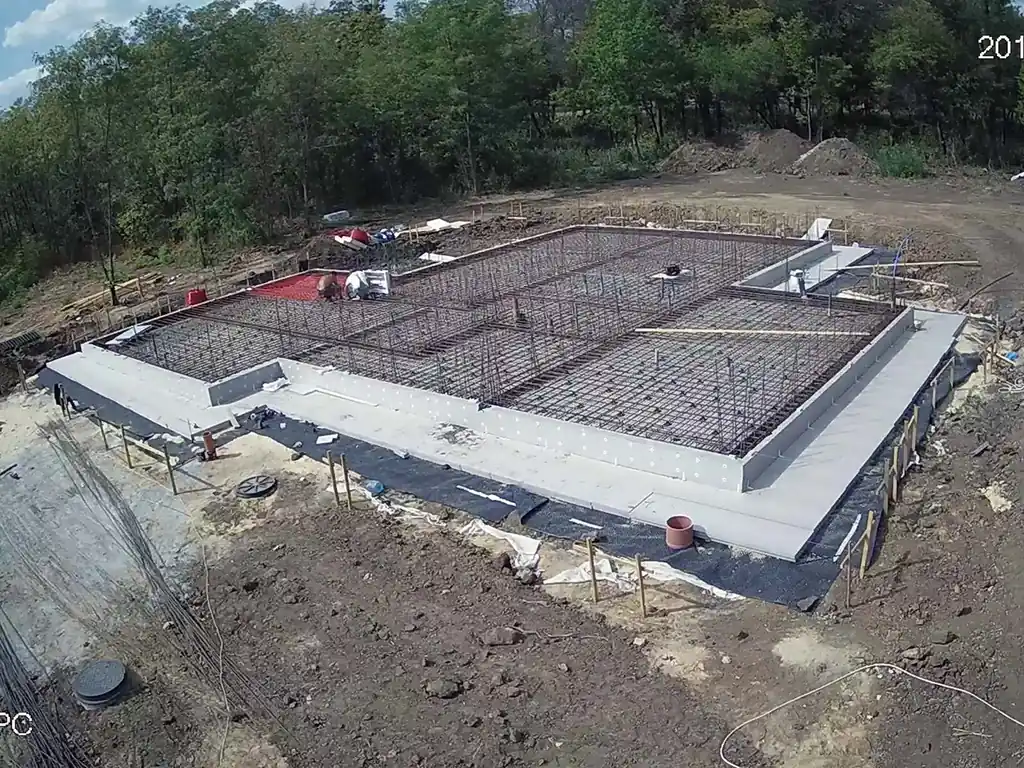
1) Excavation, base preparation, and service planning
Start with accurate setting‑out and a base that can be compacted and leveled. At this stage you also lock the locations for:
- plumbing stacks and drains,
- water supply,
- electrical conduits,
- future mechanical routes (MVHR ducts, condensate, etc.).
Tip: treat penetrations as part of the thermal envelope strategy. Keep critical connections inside the insulated zone whenever possible.
2) Install rigid insulation under the full slab area
Insulation boards are laid over the prepared base. Joints should be tight and staggered; gaps become weak points for both performance and durability. Where design requires higher strength, specify insulation grade accordingly.
3) Perimeter edge insulation and thermal bridge detailing
The slab perimeter is one of the most common sources of heat loss. An insulated Swedish slab uses a continuous insulated edge to reduce that thermal bridge. Detail the junction so the wall insulation can connect cleanly with the slab insulation (continuous envelope principle).
4) Membranes and protection layers (moisture / radon)
Depending on site conditions, local practice, and radon risk, a membrane may be used to manage moisture and gas ingress. Whatever system is chosen, the key is continuity: overlaps, tape, and airtight seals around penetrations.
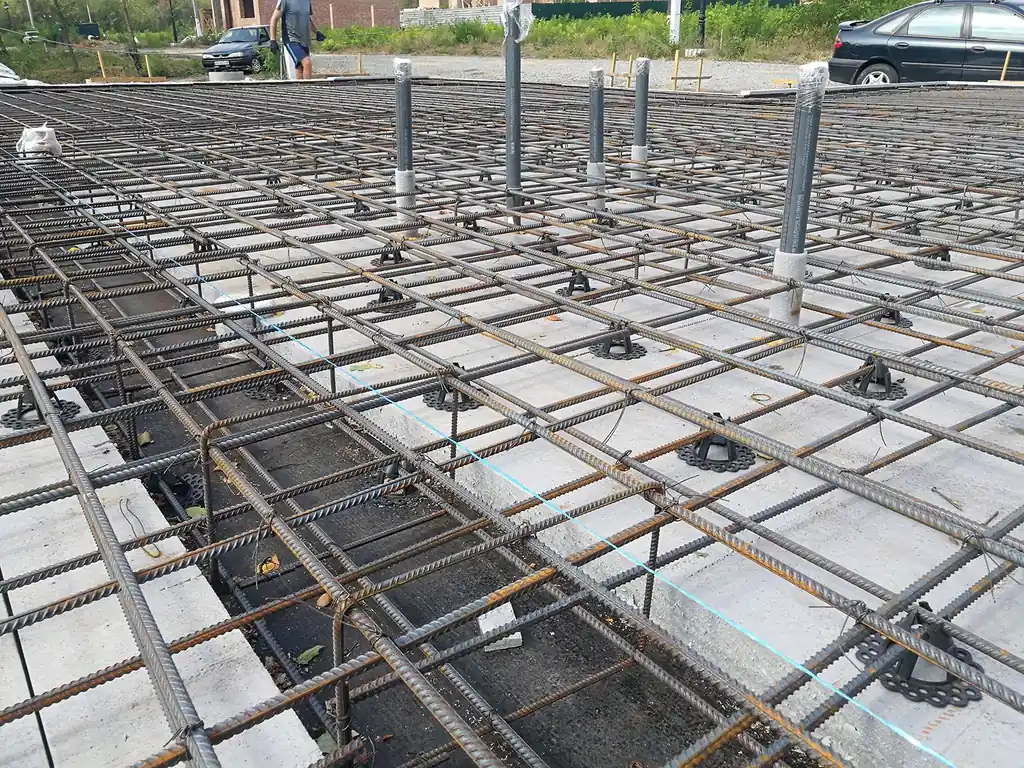
5) Reinforcement and fixing underfloor heating loops
Reinforcement is placed on spacers to achieve correct concrete cover. Hydronic heating pipes can be tied to the reinforcement in zones and circuits planned by heat‑loss calculations. Keep bends gentle, label circuits, and protect pipes during the pour.
6) Concrete pour, leveling, and curing
Concrete is poured in a controlled sequence, vibrated as required, and leveled to tight tolerances. For modular construction, slab flatness is not a luxury — it is a requirement. Protect the slab, follow curing guidance, and avoid early overloads.
Quality control checklist (Passive House mindset)
- Thermal continuity: insulation under slab + insulated edge + clear path for wall insulation connection.
- Penetrations: all sleeves and pipes sealed; no “open gaps” later filled with foam as a substitute for planning.
- Moisture/radon strategy: selected system is continuous and compatible with other layers.
- Flatness: verify tolerances before wall installation or module delivery.
- Documentation: photos of hidden layers (insulation joints, membrane overlaps, sealing details) for future reference.
Common mistakes to avoid
- Insulation gaps and unsealed joints that create cold bridges and moisture risks.
- Uncoordinated penetrations that force last‑minute cutting through insulation or membranes.
- Weak perimeter detailing (the “edge bridge”) that undermines otherwise excellent envelope design.
- Poor slab flatness that increases installation time and causes alignment problems for modular walls.
FAQ
Is an insulated Swedish slab always better than a traditional strip foundation?
Not always. Soil conditions, groundwater, structural loads, and local regulations matter. But for energy‑efficient buildings, USS can simplify thermal bridge control and provide a comfortable, high‑performance base.
Can USS be used with modular homes?
Yes. In fact, a flat, insulated slab with pre‑planned penetrations is one of the best foundations for modular construction, reducing on‑site uncertainty and speeding up installation.
Do you always need underfloor heating in the slab?
No. Many Passive House projects heat via ventilation or compact hydronic systems. Underfloor heating is a comfort choice and can be efficient when designed for low temperatures.
Next in the series: airtightness and thermal bridge‑free junctions (slab‑to‑wall, window installation in the insulation layer, and envelope sealing strategy).